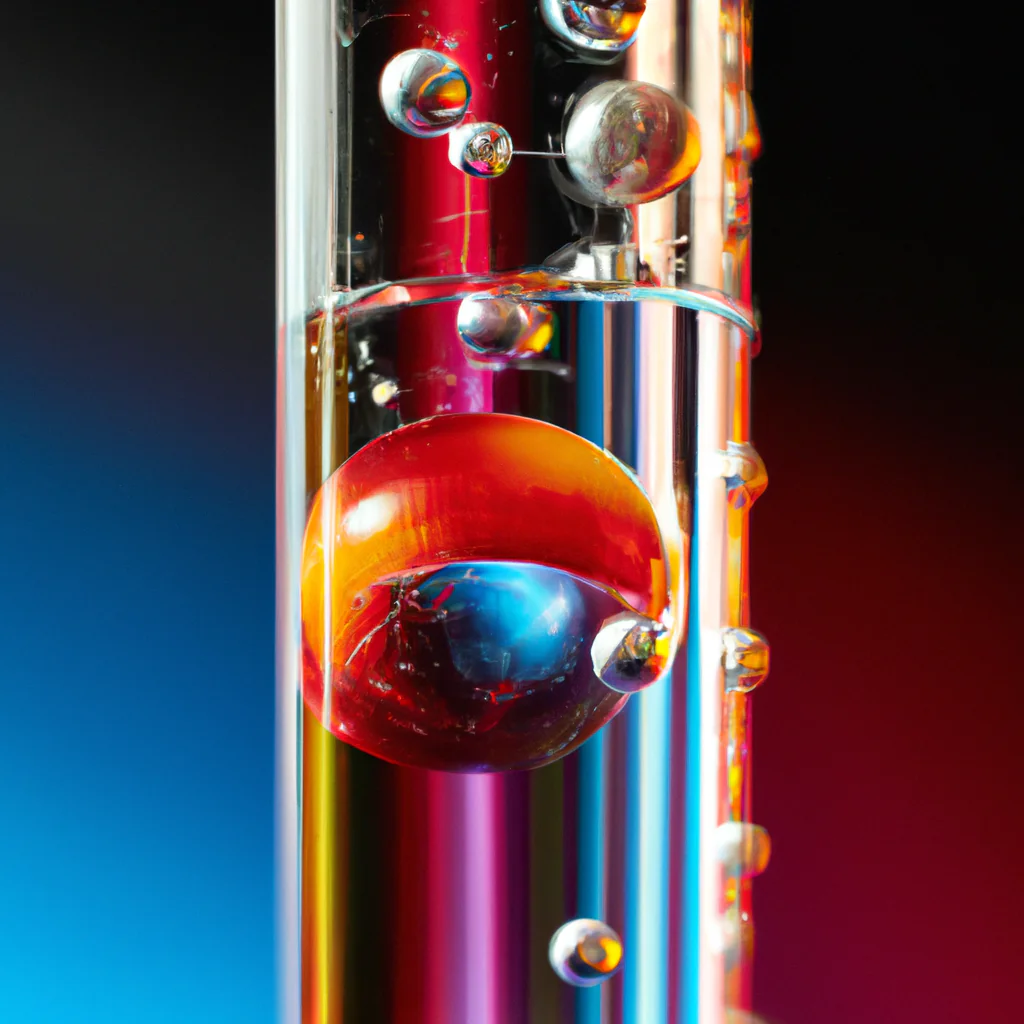
A Galileo thermometer is a unique and visually appealing way to measure temperature. If you’ve recently purchased one or if you’re thinking about getting one, you may be wondering how to read a Galileo thermometer and which temperatures it can accurately measure. In this article, we’ll answer all your questions about Galileo thermometers, including how to find the temperature, where to put it, and what to do if you need to shake it.
Table of Contents
How to Read a Galileo Thermometer
A Galileo thermometer is an elegant way to display temperature. The thermometer is filled with glass balls of varying weights, each attached to a metal disc stamped with a temperature.
By reading the metal tag attached to the lowest floating balls in the top half of the thermometer, you can accurately measure the temperature. This is because the principles of buoyancy determine whether an object floats or sinks.
Measuring the temperature using a Galileo thermometer is both easy and accurate. All you need to do is look at the lowest floating balls in the top half of your thermometer in order to get a precise temperature reading.
- Step 1: Look at the lowest floating balls in the top half of your thermometer.
- Step 2: Read the metal tag attached to them.
- Step 3: Compare this to the pre-marked temperatures listed on the thermometer.
- Step 4: Note that this comparison gives an accurate reading of outside temperatures.
The principle behind how a Galileo thermometer works is simple yet fascinating. Heavy balls sink and lighter ones float when placed in liquid. Since liquid temperatures can cause changes in weight, these differences can be used as an indicator for variations in temperature.
This process allows us to easily read temperatures without having to resort to complicated calculations or more advanced instruments. With just one glance at a Galileo thermometer, you can gain an instant understanding of what temperature your environment is at.
The Temperature Range of Galileo Thermometers – What You Need to Know
Few things can accurately measure temperature like the Galileo thermometer. This unique device is equipped with glass bulbs of varying sizes and colored liquids; working together, these features are capable of accurately measuring a wide range of temperatures.
The basic Galileo thermometer offers a temperature range from 64°F to 80°F. This range is divided into five distinct increments, in threes of four degrees. That means that each increment represents a change of four degrees.
The Galileo thermometer isn’t just accurate – it’s also aesthetically pleasing! The bulbs are designed to be beautiful and the liquid starts off in shades of blue or green at lower temperatures, then changes into hues of red as the temperature rises. It looks stunning on any shelf or desk.
In order to read the Galileo thermometer correctly, it helps to know how it works. The glass bulbs are each filled with a colored liquid and a small weight at their base. The weight causes them to sink or float depending on the surrounding temperature.
- When the temperature drops below 64°F, only the lowest bulb will sink.
- Between 64°F and 68°F, two bulbs will sink.
- Three bulbs will sink between 68°F and 72°F.
- At temperatures between 72°F and 76°F, four bulbs will sink.
- At 76°F and above, five bulbs will sink.
The Galileo thermometer is an excellent choice for anyone in need of an accurate temperature reading within this 64-80°F range. Not only does it provide accurate readings, its beauty makes it a great addition to any home or office décor!
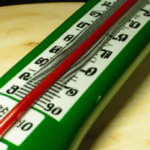
Reading Thermometers – Mastering the Technique
Having the temperature readings from a thermometer is important to our daily life. Thus, it is best to learn the proper way of reading it correctly. In this post, we will guide you on how you can read a thermometer correctly.
Hold the thermometer at eye level and make sure that its numbers are facing you. Focus your eyes on the numbers and measuring scale, which consists of vertical lines that help indicate a temperature reading in either Fahrenheit or Celsius.
Here are four essential steps to consider when using your thermometer:
- 1. Identify the type of thermometer. Most thermometers have two scales for temperature, Celsius and Fahrenheit. Some have a combination of both these temperatures for precise measurements.
- 2. Look for the numbers & measuring scale. Keep your eyes focused on the black lines (Picture 8). These vertical (up and down) lines stand for degrees of temperature.
- 3. Determine how many degrees each line represents. You should be able to figure out how many degrees each line measure by looking at the beginning and ending marks of each line.
- 4. Calculate the corresponding temperature. Once you’ve determined this information, look at the location of your thermometer’s needle in order to calculate the corresponding temperature.
By following these steps and staying attentive when reading your thermometer, you can ensure you’re getting accurate readings every time!

Where to Put a Galileo Thermometer for Accurate Readings
A Galileo thermometer is a unique and creative way to display temperature. It consists of a glass cylinder filled with liquid and colorful floating spheres or bulbs. The exact temperature can be determined by noting which colored bulb is highest in the tube. In order for the thermometer to work properly, it needs to be hung in the right place.
Hanging the Galileo thermometer indoors is recommended, as the exterior temperature can vary drastically, which will affect the accuracy of the reading. It should also be hung from a hook, allowing room for movement as the temperature changes. To get the most accurate data, it should not be hung in direct sunlight, as it can cause the readings to be inaccurate.
Once installed, it’s useful to give your Galileo thermometer a few minutes to adjust before taking a reading. This allows time for all of its parts – including fluids and air bubbles – to move within its tube and settle, so that you get an accurate representation of the current temperature.
How does this happen?
As the ambient temperature rises and falls, so do the densities of the liquid and floating bulbs or spheres. When temperatures rise, these materials become less dense, causing them to rise; when temperatures fall, they become more dense and sink. The colored ball closest to either end of the tube will indicate the current temperature.
- Hang Galileo thermometers indoors.
- Keep away from direct sunlight.
- Allow time for settling after installation.
- Changes in density determine temperature change.
Though it takes some setup time, you’ll find that having a Galileo thermometer in your home or office is both beautiful and useful. As long as it’s set up correctly, you can trust your Galileo thermometer for consistent readings any time of year!
Shake or No Shake: Should You Agitate a Galileo Thermometer?
The Galileo thermometer was invented by physicist Galileo Galilei and is an accurate thermometer that uses liquid sealed glass bulbs and air to measure temperature. It works by the principle that when the surrounding air temperature changes, so does the overall density of the liquid inside the glass bulbs.
This means that when you take a reading from a Galileo thermometer, you must shake it in order to get the mercury from a previous reading back into the bulb so that a new reading can be taken.
Shaking the thermometer is not only important for getting a new reading, but it also helps to improve accuracy. By shaking the thermometer before taking each reading, you are ensuring that all bulbs have equal amounts of mercury inside them and are at comparable temperatures.
If you use a Galileo thermometer to measure your temperature, it’s important to remember to shake it before each use. Here are some tips for properly shaking your thermometer:
- Hold the thermometer at its bottom with one hand.
- Gently rock and rotate it with your other hand.
- Perform 10-15 rotations/rocking motions.
- Make sure to shake until all bulbs reach their equilibrium with one another.
By following these steps before each reading, you can ensure accurate results from your Galileo thermometer. So keep shaking and enjoy accurate readings!
Getting to the Bottom of It: What is the Liquid Filling a Galileo Glass Thermometer?
Have you ever wondered what the clear liquid is in a Galileo thermometer? The answer is the colorless ethanol, also known as ethyl alcohol. This volatile liquid has a very low odor and it can have various densities depending on the temperature.
Ethanol is an alkyl of CH3-CH2-OH and has an atomic weight of 46.07 according to National Center for Biotechnology Information. It’s a flammable liquid and its boiling point is around 78°C (172°F). It’s typically used as fuel or as a solvent in many chemical processes.
The density of ethanol depends heavily on the temperature of the environment. This can make measuring it difficult as its density relative to water varies depending on the temperature range. For this reason, it’s more often used in laboratory settings where greater accuracy needs to be achieved.
The use of ethanol in modern day Galileo thermometers dates back to the early 19th century when they were first developed by an Italian physicist and mathematician, Galileo Galilei. He wanted to create an instrument which could measure changes in air temperature using the changing densities of ethanol.
Benefits of using ethanol:
- Low odor and transparent color.
- Flammable.
- Easy to measure with accuracy.
Today, Galileo thermometers are mostly seen as decoration, but understanding what is inside them helps us appreciate their unique design even further. By knowing that the clear liquid inside them is indeed ethanol, we can gain a deeper understanding of their inner workings.